
DIY Drill Press Table and Fence
This easy to make Drill Press Table is the perfect one day shop project! The sliding dovetail system is easier to install than t-tracks and when paired with the MICROJIG accessories this table and fence system is everything that you need for your drill press stand.
Before we get started please click here to subscribe to my YouTube channel for more projects.
Cut List:
Everything is made from 3/4" plywood
2 - 24" x 12"
*On one section cut 3/8" deep dovetail groves at 2" and 5" off the front edge (long edge). Then cut dovetail groves at 5" off of each short edge. Optional: I cut a third vertical dovetail grove in the center of the board and stopped it at the middle point. This was for extra hold down options.
1 - 24" x 3" (Fence face) Cut a dovetail grove 1" from top edge
1 - 24" x 2 1/4" ( Fence bottom) Drill holes for dovetail hardware 5" from each edge
2 - 2 1/4" x 2 1/4" (supports)
Supplies:
List of all my tools that I use
Tools Used during this build:
Cut Pieces for Table and Mark Lines for Dovetail Grooves

To get started cut two pieces of 3/4” plywood 24" x 12"

After cutting the plywood, lay out lines on one of the table top pieces. These lines will be used as guides to route the dovetail grooves for the clamping areas and fence. On one section mark lines at 2" and 5" off the front edge (long edge).

Then mark lines at 5" off of each short edge. Optional: I marked a third vertical line in the center of the board and stopped it at the mid-point. This was for a middle dovetail grove to provide extra hold down options.
Microjig Hardware Used in This Project

I used this Matchfit Dovetail Clamp Pro Kit from Microjig. The kit includes a variety of dovetail hardware, a set up gauge, a dovetail router bit and dovetail clamps. I have become a huge fan of dovetail groves in place of metal t-track systems. They are easier to install and offer a lot more options as well as better clamping power.
Route Dovetail Grooves

Using the router bit and guide, that comes with the kit, set up the router bit in my router table and route the dovetail groves, using the lines as a guide.

If you dont have a router table you could easily use a hand held router and a straight edge to complete this step.
Mark, Cut, and Remove Area for Sacrificial Pieces

Using a 4" x 4" template a marked a square off center to the left and up. If you were to mark lines on the square dividing it into four equal parts, insure that the place were the drill bit will come down is only in one of these quadrants.

Drill holes on the inside corners of your lines to help in cutting the square out with your jigsaw.

This will be cut out for a replaceable sacrificial piece. It’s off center so that you can remove and turn the square for a fresh surface area four times before having to replace it.
Assemble Table Bottom


Laminate both bottom pieces together (dovetail groves on the outside of course) using wood glue and clamps.


Once the glue is dry, remove the clamps, and trim the edges even.

Finish Table Bottom and Install Hold Down Accessories

After the table top was laminated together and trimmed, use a chamfer or round-over bit to break all of the edges on the table.

Cut a piece to fit the 4” x 4” square that was cut out in the center of the table in the earlier steps

Using a forstner bit, drill holes on all four corners of the center square.

The finger holes will allow you to remove the sacrificial piece and turn or replace.

Next, countersink some threaded hardware and hold downs to the bottom of the table.

I had these laying around the shop but you can choose any type of hardware that will best hold the table to the drill press.

These worked great!
Construct and Install the Fence

Cut one piece 24" x 3" (Fence face) and then cut a dovetail grove 1" from top edge.

This will be used for a stop block and dovetail clamps if needed .

Using a counter sink bit, drill holes on the sides and along the bottom of the fence face.

These will be used to attach the supports and bottom piece of the fence.

Next, cut one piece 24" x 2 1/4" ( Fence bottom) and drill holes for the dovetail hardware 5" from each edge.


Using clamps to hold it in place, attach the fence face to the fence bottom with screws and glue.

Next, cut two pieces at 2 1/4" x 2 1/4" (supports)


Attached the supports to both ends of the fence with glue and screws.

Attach the Fence and Stop Block

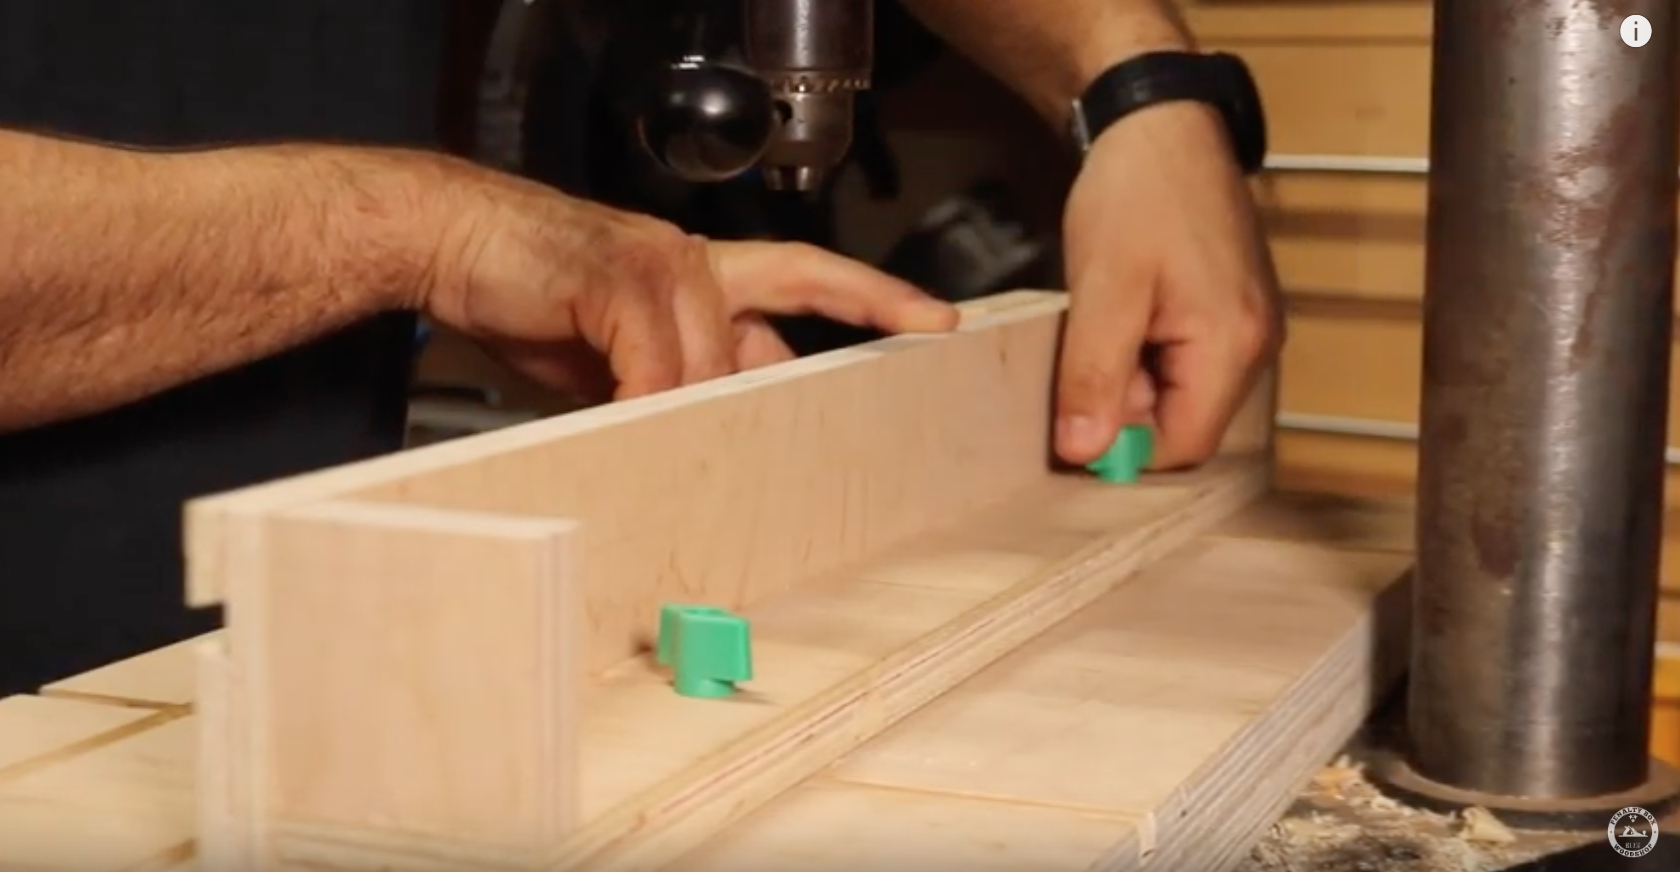
Install the dovetail hardware into the two holes in the bottom of the fence and then attach the fence to the table utilizing the hardware and corresponding dovetail grooves. The hardware can be tightened to hold the fence at any distance from the drill bit.


Once your fence is completed you can add a stop block for repeatable results. Again, all it takes is a simple hole for the dovetail hardware and the stop block is ready to go.
Use Your New Drill Press Table and Fence


Utilizing a dovetail clamp, in the various dovetail groves, to hold down your work piece makes this process more repeatable and safer. This simple shop project can add a lot to any shop!